pax86 - Blog
Aug 24th, 2014 - iOS work
Upgrading my iOS build environment for iOS SDK 7.1
Recently I have been working on upgrading my iOS version of pax86 to compile and run with the latest XCode and iOS SDK versions. Originally when I ported pax86 over to iOS, I only had a "hackintosh" machine running OS X Snow Leopard, and I only was able to run a very old XCode version on it. I also had no way to test the code, so I had to trust the users of pax86 to be able to figure out any possible problems. This is of course not a usable solution in the long run, so I decided to finally upgrade my iOS building environment.
I started by purchasing an iPad. I then tested whether I could run my pax86 (compiled for iOS 4.3 on my Hackintosh) on the iPad (which is running iOS 7.1), but it looked like the version discrepancy was simply too big. So, the next step was to purchase a MacBook Air. I installed XCode 5.1.1 on it, with the iOS 7.1 SDK, and then began to hunt for tutorials to explain how to actually build something for running on an actual iOS device. I found a tutorial How to Test Your App on an iOS Device which seemed to explain all the necessary steps in sufficient detail. There were a lot of steps related to all kinds of certificates, but luckily these only needed to be done once. In the end I got the included OpenGL sample application to start on my iPad, so I was in business!
Next, I experimented with simply including my libpax86.a built on my "hackintosh" into this iOS 7.1 sample project, but that did not turn out to be quite that easy. It seemed that some of my pax86 code was complied for armv6 architecture and some for armv7, but my iPad wanted armv7s architecture. It was pretty simple to fix my Makefile to compile all sources to armv7 architecture, but my old XCode did not understand armv7s at all. Because I want to use the same sources also for Android, I did not even want to have my code use that strange armv7s architecture! I thought that there must be a way to fool the linker to accept armv7 architecture sources to armv7s iOS application, so I began to google for possible solutions.
I found a blog post by Matt Galloway titled Hacking up an armv7s library which seemed to be just what I wanted. I followed the steps on that blog post, and created a new libpax86.a that contained both armv7 and armv7s slices. My sample application on XCode 5.1.1 linked in that new library fine, and I was able to launch the sample application on my iPad! The code did not call my routines yet, so that was the obvious next step I wanted to try.
First I wanted to try to call some of my initialization routines. Those are mostly coded in C language so I expected those to work fine, which they did. I did not have any way yet to show anything on the screen, but I decided to add the game files of Doom to my project anyways, and tried to launch the game. Here I also needed to google for the syntax of getting a path to included files, but there were good examples for this so it did not take a lot of time to figure this part out. Curiously there were no errors and the software did not crash, but since I had nothing showing on the screen I could not properly determine whether the game actually started up and began running correctly.
Displaying a texture on iOS
The next major step was to figure out a way to display a texture on the screen, with data for the texture pixels copied from my emulated x86 screen. I had used the OpenGL iOS sample app as the basis for my test application, but it did not use any textures, so again I began googling for information. I am reasonably familiar with OpenGL, but completely unfamiliar with Objective-C, so I mainly needed examples for the syntax. While googling for info I learned that the Objective-C methods can actually contain plain C code, so learning the Objective-C syntax was actually not as hard as I had feared. So now I just needed to figure out the best way to draw a 2D texture on the iPad screen.
I have used various techniques in my other emulator ports, but I thought that a simple glDrawTexIOES(x, y, z, w, h) call would be the easiest. That would draw the texture as the screen background, to coordinates x, y with the size w, h. However, I only got a black screen when I attempted to use this call, and it took me a while to figure out what I did wrong. All the parameters seemed to be correct, so I thought that it should have worked. Finally it occurred to me to check the OpenGL ES version the sample app was using, and changing the API version from
self.context = [[EAGLContext alloc] initWithAPI:kEAGLRenderingAPIOpenGLES2];
to
self.context = [[EAGLContext alloc] initWithAPI:kEAGLRenderingAPIOpenGLES1];
finally drew a tiny 320x200 pixel image on the retina display of my iPad! The
image was upside down, but it was obviously Doom running in the tiny window!
It was nice to get a confirmation that my current pax86 code runs fine also on iOS devices. However, this test only confirmed that the game runs and the graphics work, but the audio side was still completely untested. So, after fixing the image to be the correct way up and scaling it somewhat larger, I began looking into audio coding for iOS.
Playing audio on iOS
I found out that iOS uses OpenAL for audio support. I used an example in a blog post OpenAL on iOS I found and began coding some audio routines to my test application. I was able to setup the audio stuff fine, but when I then began looking for a way to get a callback from the OpenAL routines when the audio buffers need new data, I was pretty surprised to not find anything! I found various forum posts wondering the same thing, how come there is no buffer empty callback, so it looked like this really was the situation on iOS.
Because my pax86 code expects to receive a callback from the front end side, I needed to implement a way to fake a callback. After some experimenting (and counting the number of samples I will probably need to send) I figured that I could perhaps use the OpenGL update method (which I believe gets called once per frame) to attempt to send the next block of sample data to the OpenAL buffers. I play audio at 32kHz, so if the update method gets called at 60fps I will need to send around 533 samples, and at 30fps around 1066 samples during each call. To be on the safe side I decided to attempt to send 2048 samples whenever there is a free buffer. I decided also to use triple buffering, as was recommended in some of the examples I found on the net. If all the buffers are full, I simply try again during the next frame.
In my earlier blog post about running Doom on Windows Phone 8 I showed my WP8 front end audio code, so here is the corresponding code from my iOS test front end. First the audio setup:
#define NUM_BUFFERS     3

static ALCdevice *openALDevice;
static ALCcontext *openALContext;
ALuint sourceID, buffers[NUM_BUFFERS];
ALuint frequency = 32000;

- (void)setupAudio
{
    openALDevice = alcOpenDevice(NULL);
    openALContext = alcCreateContext(openALDevice, NULL);
    alcMakeContextCurrent(openALContext);

    alGenSources(1, &sourceID);
    alGenBuffers(NUM_BUFFERS, buffers);

    alBufferData(buffers[0], AL_FORMAT_MONO16, silent_buf, 2048*2, frequency);
    alBufferData(buffers[1], AL_FORMAT_MONO16, silent_buf, 2048*2, frequency);
    alBufferData(buffers[2], AL_FORMAT_MONO16, silent_buf, 2048*2, frequency);
    alSourceQueueBuffers(sourceID, NUM_BUFFERS, buffers);
    alSourcePlay(sourceID);
}
and then the silent_audio() handling and callback emulation:
static short silent_buf[2048];

static void silent_audio()
{
    ALint val;
    ALuint buf;
    alGetSourcei(sourceID, AL_BUFFERS_PROCESSED, &val);
    if (val <= 0)
        return;
    alSourceUnqueueBuffers(sourceID, 1, &buf);
    alBufferData(buf, AL_FORMAT_MONO16, silent_buf, 2048*2, frequency);
    alSourceQueueBuffers(sourceID, 1, &buf);
    alGetSourcei(sourceID, AL_SOURCE_STATE, &val);
    if (val != AL_PLAYING)
        alSourcePlay(sourceID);
}

- (void)update
{
    if (running && audio_cb)
        audio_cb();
    else
        silent_audio();
}
Curiously this worked on the first attempt, and I heard the familiar Doom music and sound effects playing on my iPad! So, now I had managed to test all the essential features of pax86 also on iOS, in addition to my earlier work on Windows Phone 8 and Android environments. I still don't have any input support coded for my iOS test application, so that will be the next feature I will work on.
Compiling the same ASM code for both Android and iOS
After I got the audio working, I decided I need to update my pax86 Makefile to build the libpax86.a library also on my new MacBook, instead of only running on my hackintosh machine. I have been using a perl script based on David Conrad's gas_preprocessor.pl to reformat the GCC-syntax ASM files to a format that Apple's llvm-gcc compiler understands. However, XCode 5.1.1 does not include the llvm-gcc compiler any more, so I needed to switch to using clang for the compiling. Luckily it turned out that the ASM syntax has stayed largely the same. I needed to make a couple of small improvements to my perl script, but after that my Makefile generated the libpax86.a library on my new MacBook Air quite fine. So finally I can stop using my old hackintosh computer completely!
June 28th, 2014 - New subdomain for pax86
Today I created a new subdomain for pax86. Until now information about pax86 has been separated to the blog posts of my various freeware emulators. However, since pax86 is my emulation core specifically for commercial licensing, I thought that it actually deserves its own web pages. So here they finally are!
Dec 1st, 2013 - FPU work, unaligned access, Doom benchmarks
FPU support
For the past couple of weeks I have continued working on the WP8 version of my emulator core, and I have also done some enhancements to the Android version and also to rpix86. The most notable enhancement is the addition of floating point support. So far only my emulators running on the MIPS architecture (ds2x86 and zerox86) have emulated the floating point opcodes. The ARM architecture emulators have silently ignored all FPU opcodes. There are some games that need the FPU support, though (like the X-COM series games), so I wanted to finally port the FPU emulation also to my ARM emulators.
I began by implementing the FPU support to the new Windows Phone 8 version. I used a simple test C source file where I added the floating point code that I wanted to implement, and then compiled that C code to ASM code (giving the /Fa parameter to the C compiler). This way I was able to determine the proper floating point calling convention to use, and also the internal names of the Windows runtime helper methods for some routines (conversion between a double and 64-bit integer, for example).
Here is a small example of the C code, for converting a double value to an integer:
double fpu_regs[9];
int tst;

void ftest64(int idx)
{
    tst = fpu_regs[idx];
}
This is the ARM ASM code that this C code produces:
|ftest64| PROC
    movw        r3,fpu_regs
    movt        r3,fpu_regs
    movw        r2,tst
    movt        r2,tst
    add         r3,r3,r0,lsl #3
    vldr        d0,[r3]
    vcvt.s32.f64 s0,d0
    vmov        r3,s0
    str         r3,[r2]
|$M4|
    bx          lr

    ENDP  ; |ftest64|
I managed to implement all the FPU opcodes for the WP8 version during the previous weekend, and they seem to work at least mostly correct. I haven't yet tested them thoroughly, so there may still be problems. During this weekend I then implemented the same to the Android version (ax86) and also to the rpix86 version. Those have different floating point calling conventions, as Raspberry Pi uses "hard float" and Android by default uses "softfp" calling convention. I am not sure whether my code is yet correct for both of those calling conventions, so I will continue working on that.
Unaligned access
A couple of weeks ago I also decided to test what happens if I let my code to use ldr opcodes to load data from memory addresses that are not correctly aligned to 32-bit word boundaries. I have coded all my memory accesses that can be unaligned to use separate ldrb and strb opcodes. This seems rather slow, and since the newer ARM processors since armv6 have the option to allow unaligned memory accesses, I wanted to test whether that actually works. The kernel can decided whether such access is allowed or not, and I wasn't sure whether Windows Phone, Android or Raspbian actually allow this.
I coded some of the most often used opcodes to always use ldr opcode, and somewhat to my suprise, the code worked on all those platforms! Next I changed some more opcodes, and then tested running DOOM timedemo whether the code runs faster or slower. The result was that on both Windows Phone and Android the code executed noticeably faster (DOOM timedemo ran up to 10% faster), but on rpix86 it ran slightly slower. So, it looks like I will by default enable unaligned access on WP8 and Android, but not on rpix86.
DOOM benchmark results
Okay, since I was able to get some more speed using unaligned access, and since I have now benchmarked all of my emulators that can run DOOM, I thought it might be a good idea to collect the results in a single table. So, here is the DOOM benchmark result table for all of my emulator versions.
| real tics | avg fps | SoC/CPU Type | Device | Emulator | Remarks |
| 2660 | 28.1 | Tegra 3 @ 1.3 Ghz | Nexus 7 Tablet | ax86 | |
| 5387 | 13.8 | Snapdragon S3 @ 1 Ghz | Nokia Lumia 520 | pax86 | |
| 6451 | 11.6 | MIPS32r2 @ 1 Ghz | GCWZero | zerox86 | http://zerox86.patrickaalto.com |
| 14352 | 5.1 | MIPS32r1 @ 396MHz | DSTwo cart | DS2x86 | http://dsx86.patrickaalto.com |
| 24112 | 3.1 | ARMv6 @ 700MHz | Raspberry Pi | rpix86 | http://rpix86.patrickaalto.com |
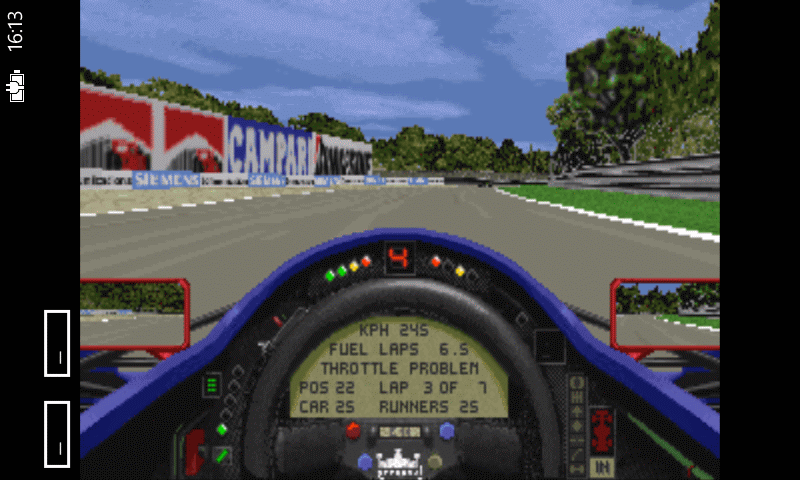
I still have a lot of improvements and compatibility enhancements to do for the Windows Phone 8 version of my emulator. It does run some interesting games already, like for example Grand Prix 2, from which the screen copy below is from. That game can run in SVGA mode, but also mentions Pentium 90 as a recommended system, so I am running it in VGA mode to get a reasonable framerate on my Nokia Lumia 520 phone.
Nov 10th, 2013 - Doom on Windows Phone 8!
Since my last blog post I have continued working on the Windows Phone 8 port of my emulator. The first step was to port all the C codes that handle the DOS file I/O and such, and also the various ASM codes that handle all the different graphics modes. I had again split the main goal of getting Doom to run on the WP8 version of my emulation into various sub-goals, so that I don't try to take on too much work at one time. I like to get something concrete done every day I work on my emulators, so I prefer to have suitably small tasks to do.
Step 1: Getting my emulator banner to show up on the Direct3D background.
The first step on the road to get Doom running was to replace the spinning cube in the template application with a background texture, on which I could then blit a screen image from my emulator. I looked at some example code and tried to learn how to use textures in Direct3d (with which I am not at all familiar). First I wanted to make the cube stop spinning, and simply show one face of the cube aligned to screen coordinates. I found a thread about this on the MSDN forums, and the reply that mentioned using Vertex Shaders for this seemed like a neat approach. So, I experimented with removing the projection matrix completely, and in the end I managed to get a screen-aligned quad displaying on the phone screen.
The next step was to have this quad contain a texture. I found a good example on the Nokia Developer pages. It was based on the same spinning cube example I had been using, but it enhanced this example with displaying a texture on each side of the spinning cube. Combining that texturing code with my screen-aligned quad, and filling the texture with random data, produced an interesting pattern on the phone screen, so I knew I was on the right track!
After that it was a simple thing to call my screen blitting routine from the CubeRenderer::Update() method, using DeviceContext->UpdateSubresource() call for the texture. And testing that version I got my ax86 banner to display on the phone screen!
Step 2: Getting 4DOS.COM to start up.
The next goal was a lot more ambitious, I wanted to get 4DOS.COM starting up. This requires a lot of the DOS kernel functions to work, and it also meant that I had to load the actual 4DOS.COM file from the phone storage media, emulating the DOS directory structure and all such. I had two major WP8-related problems to solve, in addition to making my own file access code WP8-aware:
- How to include files (assets) into my project?
- How to get the directory where these files get stored on the phone?
For the second problem I found out (via Google) that the files get installed into the InstalledLocation of the Current Package. I used the following code to get the ascii string path to the file I wanted to start up in my emulator:
    Windows::Storage::StorageFolder^ folder = Windows::ApplicationModel::Package::Current->InstalledLocation;
    auto wideData = folder->Path->Data();
    int bufferSize = folder->Path->Length() + 1;
    char *fpath = new char[bufferSize];
    WideCharToMultiByte(CP_UTF8, 0, wideData, -1, fpath, bufferSize, NULL, NULL);
    sprintf_s(path, 255, "%s\\4DOS.com", fpath);
After that I then spent some time fixing various problems in my file path handling routines (as they were based on UNIX path names with forward slashes, while Windows uses backslashes, just like DOS). But in the end I managed to get 4DOS.COM starting up!
Step 3: Getting TREKMO to run
Getting 4DOS.COM running meant that my DOS kernel routines and text mode screen blitting was working. Next I wanted to test some graphics mode routines, and the best test program for that is my TREKMO demo. It runs in Mode-X tweaked VGA mode, and it also runs in protected mode but does not need any high memory, so it is a good limited test bench for those features. To my considerable surprise, TREKMO started up and ran fine on the first go!
Step 4: Starting up DOOM
Okay, since TREKMO ran without problems, next I tested DOOM. However, it just quit immediately with a message "game state unknown". I googled for this and it seems to be caused by the game not finding the WAD file. Immediately I remembered that I had just commented out the DOS FindFirst/FindNext routines, because WP8 did not seem to have opendir and readdir routines that I use on Android to emulate these directory scanning routines. I debugged the calls, and indeed DOOM wanted to find the WAD files using these calls.
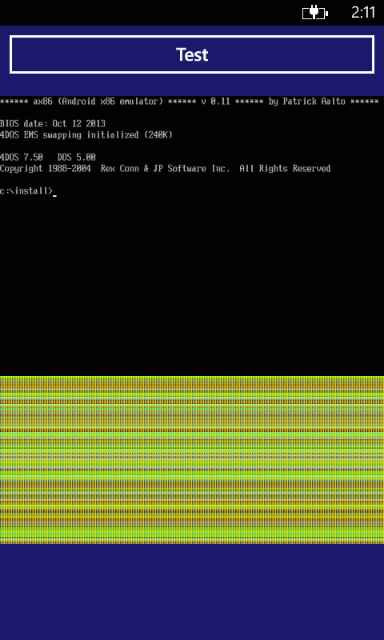
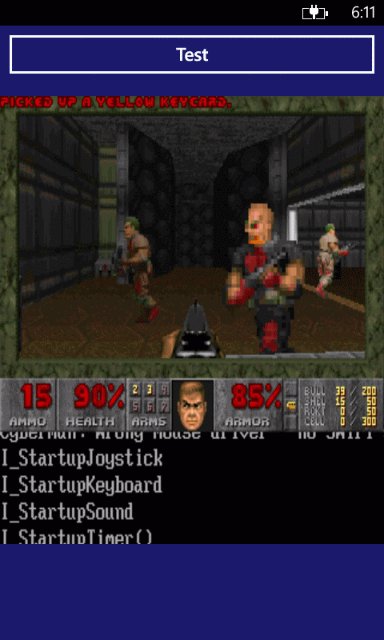
I almost accidentally found a list of supported C API calls on Windows Phone, and noticed that WP8 has _findfirst and _findnext routines, which work pretty much like the DOS counterparts I needed them for. So, I added some ifdefs to my DOS file code, and after some tries I managed to get DOOM to find the WAD file, and it launched into the demo game fine! Here below are a couple of screen copies, the first one is from when I first got 4DOS.COM to start up, and the second one is from the first DOOM test run. Looking at the phone time display, it took me exactly 4 hours to go from 4DOS.COM first starting up to when DOOM ran. So, I managed to reach my goal of starting up DOOM faster and with fewer problems than I expected, so I was pretty happy with my progress.
Poor WP8 timer resolution problems
After I managed to start up DOOM, I decided to test how fast it runs on the various Nokia Lumia phones available on the Nokia Remote Device Access. I added both 4DOS.COM and DOOM into my project, together with a 4START.BTM that launches the DOOM timedemo. I did not have any keyboard input (nor audio support) yet, but I thought that I would get some interesting performance info already. However, after testing on a few phones, it looked like the faster the phone is, tho slower DOOM runs (based on the "realtics" results). It was easy to see that the faster phones actually ran the game much faster, so what was the problem that caused the realtics results to be wrong?
After some debugging I realized that even though I had set the Windows ThreadPoolTimer to run at the speed the game sets the PC timer to (in this case 140Hz), it actually ran only from 50Hz (on Nokia Lumia 520) to 85Hz (on Nokia Lumia 1020). This was rather annoying, as the periodic timer interval is given in 100ns units (10.000.000 Hz), so I though it could run at up to 140Hz, at least!
In the end I had to abandon the idea of using the ThreadPoolTimer for anything, instead I need to periodically check the QueryPerformanceCounter return value and test that against the next expected timer interrupt value, in my main CPU emulation loop. This does slow down the actual emulation speed, but at least until I find a timer that can run at over 1000Hz on Windows Phone 8, this seems to be the only way to reach the speeds I need.
Audio support
This weekend I decided to start working on the audio support. Windows Phone 8 has a native XAudio2 audio implementation, which is aimed for games and other low-latency implementations, so that seemed to be the way to go. This time I was able to use the MSDN "Getting Started" tutorial pretty much as-is to implement my XAudio2 code. Implementing the main XAudio2 framework turned out to be quite simple, so simple in fact that I can show the whole code on this blog of mine without it taking a lot of space.
First, I need to create and start the audio within the CreateDeviceResources method. The code below is pretty much everything that is needed to get audio running, all the remaining stuff happens in the voiceCallback.
    //=======================================
    // Audio stuff
    //=======================================

    DX::ThrowIfFailed( XAudio2Create(&audio2, 0, XAUDIO2_DEFAULT_PROCESSOR) );
    HRESULT hr = audio2->CreateMasteringVoice(&m_musicMasteringVoice, 1, 32000);
    if (!FAILED(hr))
    {
        WAVEFORMATEX wfx;
        wfx.wFormatTag = WAVE_FORMAT_PCM;
        wfx.nChannels = 1;
        wfx.nSamplesPerSec = 32000;
        wfx.nAvgBytesPerSec = 32000*2;
        wfx.wBitsPerSample = 16;
        wfx.nBlockAlign = (wfx.nChannels*wfx.wBitsPerSample)/8;
        wfx.cbSize = 0;
        HRESULT hr = audio2->CreateSourceVoice( &sourceVoice, (WAVEFORMATEX*)&wfx, XAUDIO2_VOICE_NOSRC, XAUDIO2_DEFAULT_FREQ_RATIO, &voiceCallback, NULL, NULL );
        if ( !FAILED(hr) )
        {
            // Send the first silent buffer to the sourceVoice
            silent_audio();
            // Start the audio playing.
            sourceVoice->Start( 0 );
        }
    }
My emulator emulates a SoundBlaster 2.0 sound card, which is a mono device, so I
only have one channel of audio. I play audio at 32kHz, as going for the full 44.1kHz
would not improve the quality of the original SoundBlaster, and 22kHz is not quite
high fidelity enough for the AdLib emulation to sound nice.
Here are the remaining code snippets, the silent_audio() which creates one block of silence, and the voiceCallback routine, where I am only interested in the OnBufferStart callback, which happens whenever the audio engine begins playing the next already queued buffer. I am playing very short buffers (128 samples), and I was actually somewhat surprised that the XAudio2 engine actually can play such short buffers without glitches. In my Android version I need to use buffers of 2048 bytes in order to avoid glitches in the audio!
//------------------------------------------------------------
// Write one 128-sample block of silence. Helper routine for
// when the audio system is just starting up before we have a
// game running.
//------------------------------------------------------------
static short silent_buf[128] = {0};
static void silent_audio()
{
    XAUDIO2_BUFFER buffer = {0};
    buffer.AudioBytes = 128*2;
    buffer.pAudioData = (BYTE *)silent_buf;
    sourceVoice->SubmitSourceBuffer( &buffer );
}

class VoiceCallback : public IXAudio2VoiceCallback
{
public:
    void OnStreamEnd() {}
    void OnVoiceProcessingPassEnd() { }
    void OnVoiceProcessingPassStart(UINT32 SamplesRequired) { }
    void OnBufferEnd(void * pBufferContext)	{ }
    void OnBufferStart(void * pBufferContext)
    {
        if (running && audio_cb)
            audio_cb();		// Calls my audio creation routine, which calls SubmitSourceBuffer
        else
        {
            // The game is not running yet, so we need to send
            // some dummy data to the XAudio2 audio system to
            // keep it happy.
            silent_audio();
        }
    }
    void OnLoopEnd(void * pBufferContext) {    }
    void OnVoiceError(void * pBufferContext, HRESULT Error) { }
};
static VoiceCallback voiceCallback;
I left out the audio_cb routine, where I build the AdLib and SoundBlaster digital audio, as it is not relevant to this example. It ends with a similar code to that of silent_audio. In the XAudio2 documentation Microsoft warns against spending a lot of time in the callback function, but I noticed that I can calculate all the 128 samples in the callback routine without problems. I even tested with a 2048-sample buffer originally, and that too worked without audio glitches (but that causes problems in my SoundBlaster IRQ emulation, which is why I went to 128-sample buffers).
I am still having some problems with the audio and timer support, sometimes the audio just stops refreshing (the AdLib audio plays the last notes forever, and the SB digital audio loops the last played sample), so I will need to continue debugging and improving these features. Also, I haven't tested EGA graphics at all yet, nor do I have any keyboard or mouse input, so I still have a lot of work to do for this version of my emulator.
Oct 20th, 2013 - Porting my x86 emulation core to Windows Phone 8
Step 1: Converting my ASM code to Windows Phone 8
For the past couple of weeks I have been porting my x86 emulation core to run on Windows Phone 8 platform. This has not been quite as trivial as I would have hoped. There have been many changes I have needed to do to get my ASM code (all 85.000 code lines of it!) to compile for Windows Phone 8. Here is a list of the major differences and the fixes I have needed to do:
- Windows Phone 8 does not allow you to run ARM ASM code! For some peculiar reason it forces you to use only Thumb ASM code. Luckily the new Thumb2 (available on ARMv7 processors) ASM code is much improved compared to the original Thumb ASM format on the ARMv5 processor (as in a Nintendo DS, for example). It allows you to specify when an arithmetic operation should change the processor flags, and has pretty much all the same features as the ARM version. It has some limitations, though, like not allowing you to set the processor flags using a literal value instead of a register, etc.
- Microsoft uses the ARMASM ARM Macro Assembler, which of course has quite different syntax (compared to the GNU assembler I use elsewhere) for compiler directives and especially macros. This has been the most time-consuming problem, as I use a ton of assembler macros in my emulation core and have had to rewrite all of them. Luckily at least the Microsoft ARMASM macros have similar features to the GNU assembler, so I have not had to make other changes besides the syntax. The bad thing was that I had been lazy when calling the macros and had not used commas between the macro parameters (which is not required by the GNU assembler, but is required by ARMASM). So I had to change also all macro calls where the macros use more than one parameter.
- My code is based on a lot of jump tables, and this generates a new problem in Thumb code. In my ARM code I have all the jump tables inside the code section, immediately following the code that needs to use the jump table. However, there is a (withdrawn) ARM document that describes the problem of defining data inside a code section: The linker automatically adds 1 to all addresses in the code section (thus making the data address unaligned), as it assumes the address is a jump target (where the lowest bit set means this is a jump target in Thumb code). This withdrawn document describes that I could use a DATA directive to tell the assembler that my jump tables are actually data, but this does not work in the Microsoft ARMASM, at least. A newer ARM document states that the DATA directive is obsolete and is ignored, but there does not seem to be an alternate way to make the data-in-code addresses aligned. So, I have had to move all my jump tables to the data section, and load their addresses separately whenever I need to use the jump table, thus slowing down the code somewhat.
- Local label search order differs between GNU ASM ands ARMASM. Gnu assembler looks for local labels (like b 1) forward unless you use the b letter (like in b 1b), while ARMASM looks for the closest label backward unless you use the f letter (like b %f1). I had not noticed this difference until running the unit tests, and the first opcode that had a forward jump (where I used bcs %1) crashed, as it jumped backwards to some completely different code.
Step 2: Compiling my ASM code
It was quite easy to compile each separate ASM module, using the Visual Studio 2012 ARM Phone Tools Command Prompt, and simply launching the ARMASM assembler from the command prompt, like this:
armasm .\source\cpu.asm -o .\obj\cpu.obj -ignore 4509I am using the -ignore 4509 flag to ignore the A4509: This form of conditional instruction is deprecated warning message for many of the conditional instructions I use. Looks like these instructions are deprecated on ARMv8, but as I am targetting ARMv7 devices this is not yet a problem. The assembler is horribly slow, though, and currently takes 3 minutes and 50 seconds to compile my main cpu.asm module on my laptop. I don't understand why it takes so long, as building for Android using the GNU assembler takes about 2 seconds to compile the corresponding cpu.S ASM module!
After I got the ASM modules compiled separately, it was time to link them together. I wasn't quite sure how to do that, but after some experimenting I found out that using a Makefile for nmake was probably the best approach. So I began writing a Makefile that could compile my ASM and C code and then link it into some sort of a library that I could then use from the Windows Phone sample project.
For the C code I copied the options from the Visual Studio 2012 sample phone project:
CCOPTS = /GS /I$(IC) /wd"4103" /analyze- /W1 /Zc:wchar_t /Zi /Od \
	/fp:precise /D "_LIB" /D "WINAPI_FAMILY=WINAPI_FAMILY_PHONE_APP" \
	/D "WP8" /errorReport:prompt /WX- /Zc:forScope /RTC1 /Gd /Oy- \
	/MDd /EHsc /nologo
I added my include directory $(IC) and my own "WP8" compile define so that I can use that to make any changes between my Android version and this Windows Phone 8 version. I suspect there are some unnecessary flags, and there are many flags that I am a bit unclear as to what they actually do, but at least the code seems to compile using those flags. :-)
I wanted to have all my object files go to the same directory, even though my ASM sources are in a different directory than my C sources (as I share the C code with the Android version, but the ASM code is separate), so I set some directory variables in the Makefile and then just created the couple of inference rules for my ASM files and my C files, like this:
{$(SC)\}.c{$(OA)\}.obj:
	cl -c $(SC)\$(*B).c /Fo"$@" $(CCOPTS)

{$(SA)\}.asm{$(OA)\}.obj:
	armasm $(SA)\$(*B).asm -o $@ -ignore 4509
I wanted to use my Makefile to build a static library using the LIB command. This did not generate any errors, which was strange as I was sure I had a lot of unsatisfied symbols as I had renamed many global symbols while changing the macros. Switching to generating a DLL file instead of a library did however generate a huge error list of unsatisfied symbols, so I decided to do that instead, at least while fixing those symbols. After a couple of days worth of renaming the external references or adding the GLOBAL compiler directives I finally got the DLL to build. I still thought it would be easier to use a static library, so I now have both options in my Makefile, with the default being the static library:
pax86.lib : $(AOBJS) $(DOBJS) $(COBJS)
	LIB /OUT:.\pax86.lib /MACHINE:ARM /NOLOGO $(AOBJS) $(DOBJS) $(COBJS)

pax86.dll : $(AOBJS) $(DOBJS) $(COBJS)
	LINK /DLL /OUT:.\pax86.dll /MACHINE:ARM /NOLOGO $(AOBJS) $(DOBJS) $(COBJS)
Step 3: Linking my ASM code with the Windows Phone template project
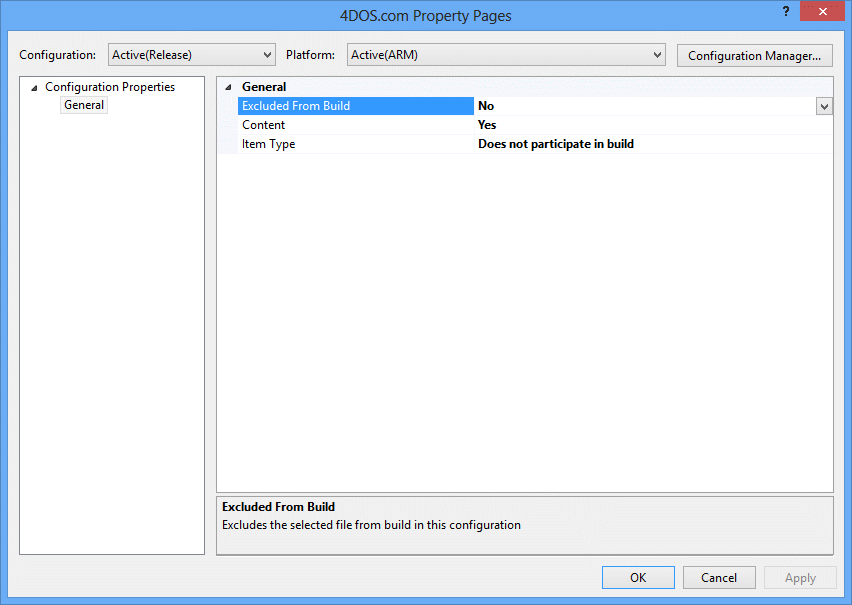
Now that I had the pax86.lib library, the next step was to somehow call the routines in this library from the Windows Phone project. I wanted to start by running my CPU emulation unit tests on the phone, as running the unit tests has always been the first step when I port my emulation core to a new platform. I selected the Direct3D with Xaml template project from Visual Studio 2012 as the basis to which I attempted to include my own code.
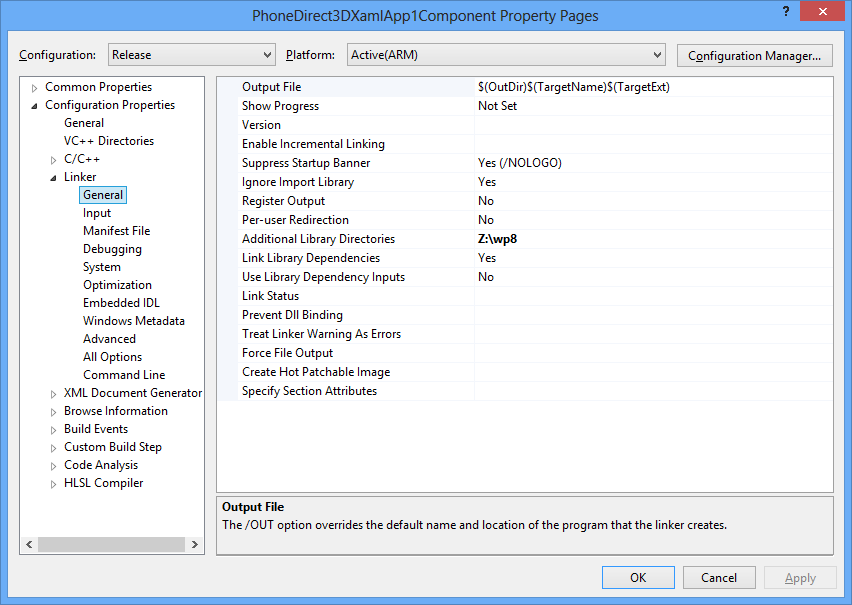
It turned out that including my pax86 static library into the default Windows Phone project was pretty easy. I simply needed to tell on the PhoneDirect3DXamlApp1Component project's property pages, on the Linker / General page where to find my library (in my case it is located at Z:\wp8), like this:
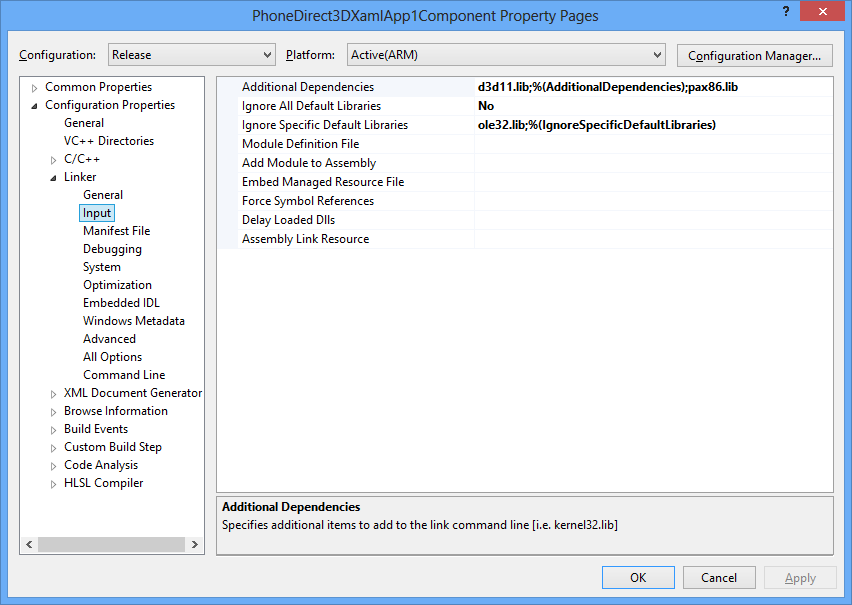
Then I simply added the name of my pax86.lib library as an Additional Dependency on the Linker / Input page of the project:
Step 4: Calling my unit test code from the Windows Phone 8 user interface
The next step was to somehow call my code from the Windows Phone code. I started by adding a Button and a TextBlock inside a StackPanel on the MainPage.xaml. Luckily working with xaml is something that I am reasonably familiar with, so this was the easy part. I also added a click handler to the button, and as a first test I simply assigned a "Hello World!" text to the TextBlock in the button click handler. When this worked fine, it was time to attempt to call my native code from this managed code of the button click handler.
I found a quite good video tutorial that explained the required steps on the MSDN channel 9 pages, called Windows Phone 8: Using C++ in your Applications. Following the ideas presented there it was reasonably easy to go from the managed C# code to the C++ code in the PhoneDirect3DXamlApp1Component, from there to my C code, and finally from my C code to my ASM code.
Here are the code snippets that I needed to add:
- In file PhoneDirect3DXamlApp1Component.h I added a public TestString()
method for the Direct3DBackground class. This method returns a Platform::String^ (a
reference-counted string):
Platform::String^ TestString(); At the end of PhoneDirect3DXamlApp1Component.cpp I added the implementation of this method, which will call the TestMain() routine in my pax86.lib library, convert the plain C char pointer it returns to a Unicode string, and return that to the caller:
extern "C" { char *TestMain(); } Platform::String^ Direct3DBackground::TestString() { char *str = TestMain(); DWORD dwNum = MultiByteToWideChar(CP_UTF8, 0, str, -1, NULL, 0); PWSTR wideText = new WCHAR[dwNum]; MultiByteToWideChar(CP_UTF8, 0, str, -1, wideText, dwNum); Platform::String^ result = ref new Platform::String(wideText); return result; }- Then I changed the button click handler in MainPage.xaml.cs
to call this new method in the native class (referenced by m_d3dBackground):
private void TestButton_Click_1(object sender, RoutedEventArgs e) { text.Text = m_d3dBackground.TestString(); } - In my unit test program module I then simply added a static char array to
contain all the text I wanted to display, and defined printf to actually
append text to my static char array. I then return a pointer to that char array
as the return value from my TestMain routine. This way I could use the simple
printf method of printing the unit test results.
#ifdef WP8

#include <stdarg.h>

#define printf  retappend

static char retstring[4096];

static void retappend(const char *format, ...)
{
    va_list args;
    va_start (args, format);
    vsprintf (retstring + strlen(retstring), format, args);
    va_end (args);
}

#endif
Of course this way of running native code is not something you would want to do in a real Windows Phone application. In the production code you should at least switch the call to an asynchronic one, check for the char array overrun, change the UI to have a scrollbar if there are more text than what fits to a screen, etc. This was good enough for my unit tests, though, so that I could focus on the important stuff, fixing potential problems in my ASM code.
Step 5: Testing without access to a real Windows Phone device
The next step was to actually run my unit tests. I originally thought that one option would be to use the Windows Phone Emulator that comes with Visual Studio 2012. However, it requires Hyper-V virtualization technique, which my laptop does not have. I also learned that the emulator actually can only run x86 code, so it would have been useless to me anyways. So if I had upgraded my PC just for this reason, it would have been money wasted.
I thought that I would need to acquire a real Windows Phone device, and was looking for different models when I ran across a site called Nokia Developer - Remote Device Access. On this site there are a large number of Nokia phones that you can use remotely, install your software on them and test how it runs. The best part is that the service is free, and allows you to use the remote access for up to 8 hours a day!
I registered myself as a Nokia developer (which again is free), and soon was running a Nokia Lumia 820 phone remotely. I was a bit worried whether I would need to somehow sign my xap file with a certificate, or to register the device via Microsoft, as I had read that some such steps are needed when testing on a real phone. However, no such steps were required using the Remote Device Access.
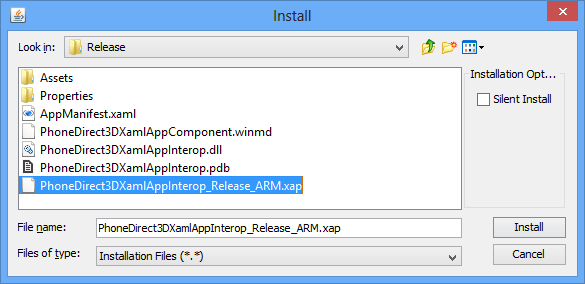
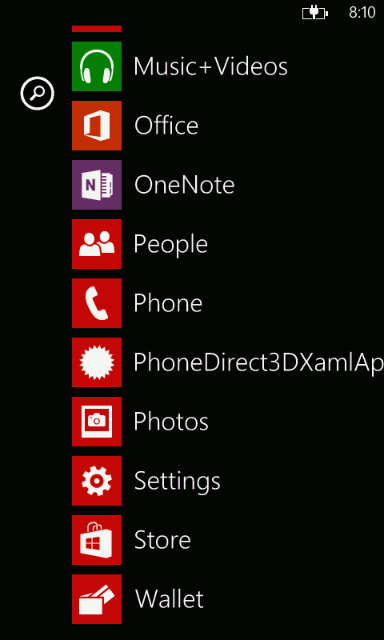
The only thing that was needed was to choose the xap file from the project bin directory, and the software got installed on the phone! Here below are a couple of screen captures from the phone, on the left my test application shows in the list of installed applications, and on the right the result of running unit tests for opcodes 0xF2 and 0xF3 (the REP string opcodes). The spinning cube is from the default Direct3D with Xaml phone template, I didn't bother to remove it as I will eventually need to use the Direct3D textures to draw something on the screen.
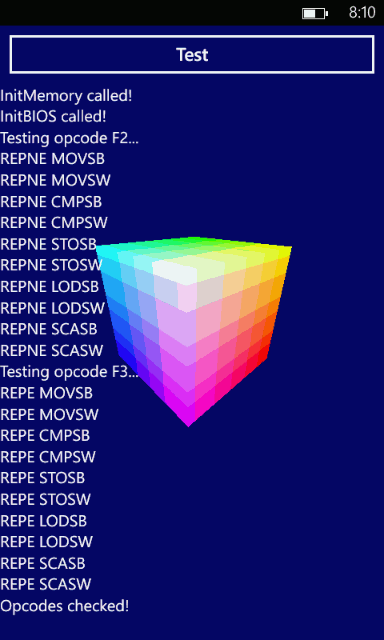
I need to run my unit tests in several steps because I don't have scrolling of the output text. That is not a real problem as it is so fast to compile the C module, build the software and re-install it remotely on the phone. I have just managed to get all the CPU emulation core unit tests to pass, so the next step is to continue porting the C code, having the file and thread routines use the Windows Phone API instead of the linux-style routines available on Android. This will keep me busy for the next couple of weeks, I would think, but I am pretty happy with the progress so far and I like the remote device access system quite a lot, it makes it easy to test my software on various Nokia phones!
Oct 6th, 2013 - My ARM x86 emulation core licensed by Retro Infinity Inc!
It has been quite a while since my last blog post for ax86. I have been working on the Raspberry Pi version, and then on the GCW-Zero version of my emulation core, so this Android version has not seen much progress. However, now I have a new licensee for my core, and thus now the Raspberry Pi and GCW-Zero versions are on hold until I can make all the changes to my emulation core that the new licensee needs. The new licensee is a company called Retro Infinity Inc.
Retro Infinity Inc has acquired licenses for many old DOS games. They plan to release the games on iPhone, Android and Windows Phone 8 platforms, among others. They are interested in using my emulation core when running DOS games on ARM-based devices, and thus I am currently working on porting my emulation core to run on all those platforms. Android is the easiest as my ax86 project already runs on an Android device, the other platforms need more work. In addition to this porting project I need to create a suitable API to my emulation core which the user interface created by them will use.
Since they hope to release the first games by this holiday season, you can imagine that I have quite a lot of work to do in a relatively short time for this project, and need to put my other emulation projects on hold for a while.
Amiga Games Inc and Retro Infinity Inc are owned by a public company Writers' Group Film Corporation, which has released several press releases concerning their future plans, if you are interested. See for example the following:
- Amiga Games Inc., a Wholly-Owned Subsidiary of Writers Group Film Corp, Announces Distribution for iPhone and iPad Through Apple's iTunes and App Store
- Writers' Group Film Corp. Closes Share Exchange Agreement With Amiga Games Inc. and Provides Corporate Update
- Writers' Group Film Corp. and Its Wholly-Owned Subsidiary, Amiga Games, Inc., Announces Distribution Through the Google Play Android Marketplace
- Amiga Games Inc., a Newly Acquired Company of Writers Group Film Corp., Announces Classic Game Co-Marketing and Distribution Agreement With Microsoft Corporation
Dec 23rd, 2012 - Happy Holidays!
Merry Xmas and a Happy New Year! To celebrate Xmas, Raiden Legacy for Android is now on sale (40% off) until December 27th! Get it now from Google Play!
I have a two week Xmas vacation starting now, and during this time I plan to make up my mind about what I will do with DSx86. At the moment it looks like it might make sense to port DSx86 to Android. I looked at the various x86 emulators available for Android, and there does not seem to be a free and fast version available. There is a free aDosBox, which however is not optimized for Android at all, so it runs really slow. The other DosBox ports and other x86 emulators seem to not be free, so there might be room for a free DSx86 port. My port should be considerably faster than aDosBox (and might even be faster than the commercial ports), but it will most likely lack in compatibility. But in any case there seems to exist a niche where my x86 emulator might fit into nicely.
Another interesting hardware for porting DSx86 to would be Raspberry Pi. It is considerably slower than current Android devices, so there would be a greater demand for a fast x86 emulator. This device would also need no keyboard (or mouse) emulation via touchscreen, so I would not need to spend time working on those. This device runs Linux (which is not all that far removed from the Android platform), so it might also be possible to target both Android and Raspberry Pi (and possibly even other Linux-based hardware running on an ARM processor) using mostly the same emulator core.
In any case, the first step would be to rewrite all hardware-specific stuff (mostly timer and interrupt-related) in DSx86 to be compatible with an underlying operating system that prohibits direct hardware access. I believe it will take me several weeks just to do that, so only after that I will need to look into actual hardware to port DSx86 to. After I make the decission, I will probably create a new subdomain and begin writing a completely new blog under that subdomain. The name of the port might be something like ax86 (for Android) or Pix86 (for Raspberry Pi) or something similar.
Happy New Year to all of you reading this blog, next year I will probably have something more specific to tell about the future of DSx86. :-)
Dec 4th, 2012 - Raiden Legacy release!
Today DotEmu is releasing Raiden Legacy for iOS and Android! What has this got to do with DSx86, you ask? Quite a bit, actually. DotEmu has licensed my x86 emulation core from DSx86, to be used in their Raiden Legacy mobile game to run the Raiden Fighters series arcade games.

Raiden Legacy and DSx86
DotEmu originally contacted me in April of this year, asking whether the x86 emulation core in DSx86 would be open for commercial licensing. I thought this was a very intriguing idea, and thus we began discussions about what exactly they need and how good a match my emulation core would be for their needs. It turned out that they needed to emulate Seibu SPI arcade machine hardware on iOS and Android mobile phones (meaning on ARM processors). The Seibu SPI hardware consists of an Intel 386 processor (running at 25MHz) that handles the actual game logic, a Zilog Z80 processor that handles music and audio processing and timing, a Yamaha YMF271 audio chip that generates the actual audio, and a custom graphics processing chip. My DSx86 emulation core only supported 286 processor at that time, so it was not well suited to this project. However, DotEmu did not need my emulation core immediately, so we agreed that I could spend up to two months porting the 386 emulation features from my MIPS core back to the original ARM emulation core.
I began this porting project in April (this was actually the "additional project" I mentioned in my Apr 29th, 2012 DSx86 blog post). I again wanted to use the test-driven development (TDD) method when porting the actual 386-specific features from MIPS to ARM, so my first step was to port my improved unit test program from DS2x86 back to ARM architecture. While porting it I further improved it quite a bit, so that it now has very thorough tests for both the 16-bit and 32-bit opcode versions, and also for the 16-bit and 32-bit memory addressing modes. For several opcodes it now contains so exhaustive tests that practically all possible input combinations and values are being tested. As I was porting and testing this, I found several problems in my original 286 emulation core, which I then later fixed in the original DSx86 version and mentioned in my Jun 24th, 2012 blog post.
After the unit tests seemed to work fine with the new 386-enabled core, I spent some time creating a version of DSx86 that could run in 386 protected mode. The Raiden Fighters games did not use any advanced features like paging or task switching, so I was able to leave all such features out of my new core. This also meant that I could only test some very simple 386-mode programs in "DSx386" (as I called my test version). I decided to again use my Trekmo demo, as it takes very little memory and only needs pretty much the same features as the Raiden Fighters games. On the 26th of May (so still well within the two months period) I finally got Trekmo running in DSx386!
Trekmo of course ran horribly slow, as adding the 386-specific features meant that I had to remove some of the speed hacks I had used in my original core. The emulation speed dropped to about 70% of the original DSx86 speed, and Trekmo ran at 3.5 frames per second. The core is also so much bigger than the 286-only core that there is practically no extended or expanded memory free. Luckily Trekmo does not need any.

The next steps after I got Trekmo running were to adjust my emulation core so that it will run on iOS and Android environment, and then integrate my core with the emulation framework that DotEmu uses. This work took pretty much the whole of June, as there were various issues that we needed to solve (like the hardware timers not being available, ASM syntax differences between iOS and Android, and so on). By the end of June my core was finally emulating the Raiden Fighters games! At that time my summer vacation was just starting, so I asked whether DotEmu needs me to work on any other aspect of the Raiden Legacy project. We decided that I could take a look at the YMF271 audio emulation, to see if I could optimize that code.
YMF271 emulation
The Yamaha YMF271 chip is practically an AdLib audio chip on steroids, so I thought that I could probably use many of the same ideas that I used in the AdLib emulation I had coded for DSx86. In DSx86 I can run 9 audio channels, each with up to 2 operators (so the total operator count is 18), on the 33MHz ARM processor. As YMF271 has a total of 48 operators, I thought that it should be possible to keep the CPU usage needs below 100MHz, which means that audio emulation should not take more than 10% of a 1GHz ARM processor of a mobile phone.
I began by running Raiden Fighters in a Windows version of MAME (Multiple Arcade Machine Emulator) with a debugger attached. This way I could check how those games actually use the YMF271 chip, and get an understanding of how that chip behaves. I found out that the games mostly use the PCM audio features (playing 8-bit samples from ROM), but they also use quite a few of the different FM audio algorithm versions. The YMF271 chip can generate FM sounds using one of four different 2-operator algorithms, or one of 16 different 4-operator algorithms. The differences come from the different ways that these operators are connected to each other to produce the final waveform.
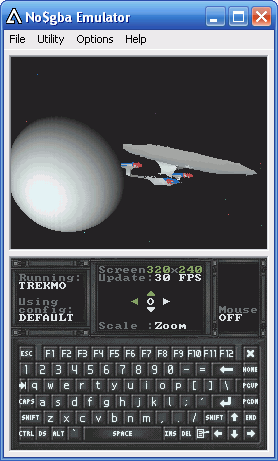
After I understood how the YMF271 chip works, I began coding a test framework in devKitPro, to be able to test my optimizations easily using the No$GBA emulator. I could also have used the Android development environment and Android emulator, but working with those would have been a lot slower. I ported the PCM algorithm and each of the FM algorithm C routines from MAME to my test program. I then used some example sounds (from Raiden Fighters) as input to the algorithms, generating a 1024-byte sample buffer. When that was working and I was able to generate some sample data, I then began implementing my ASM algorithms. I used many ideas from my AdLib emulation code, and at each step I tested the resulting sample data from my ASM implementation against the sample data from the C implementation. This way I could make sure my algorithm generates exactly the same output as the original C code.
Here below is a table showing the CPU cycle counts for creating 1024 stereo samples (on ARMv5 architecture, when running the test program in No$GBA), for various algorithms. The PCM algorithm is the simplest, and I was able to determine that playing PCM audio never uses either amplitude or frequency modulation (LFO), so I was able to skip that code completely. That is why the table shows the same 39,168 CPU cycles for each LFO variations (ams meaning amplitude modulation and pms meaning frequency modulation, named after the corresponding variables in the C code).
| Algorithm | no LFO | ams=0,pms=0 | ams>0,pms=0 | ams=0,pms>0 | ams>0,pms>0 | C-code min | C-code max | Speedup |
|---|---|---|---|---|---|---|---|---|
| update_pcm | 39 168 | 39 168 | 39 168 | 39 168 | 39 168 | 1 310 080 | 1 310 080 | 32x |
| 2fm_alg0 | 92 416 | 109 952 | 163 200 | 159 104 | 212 480 | 2 400 384 | 2 643 328 | 12x..24x |
| 2fm_alg3 | 118 912 | 126 336 | 179 584 | 176 512 | 228 736 | 2 586 240 | 2 835 200 | 12x..22x |
| 4fm_alg0 | 169 088 | 187 904 | 294 528 | 291 072 | 396 288 | 4 557 568 | 5 046 528 | 12x..27x |
| 4fm_alg14 | 202 368 | 220 672 | 327 296 | 318 976 | 429 312 | 4 930 432 | 5 424 640 | 12x..24x |
As you can see, I was able to improve the PCM algorithm so that it runs 32 times faster! Or to put it in another way, my ASM code can generate one stereo sample for every 38.25 CPU cycles used, while the C code in MAME takes over 1279 CPU cycles to accomplish the same task. These measurements are taken on ARMv5 architecture, which does not have a floating point coprocessor. The ARMv7 architecture used in many Android and iOS mobile phones has floating point support, and as the original C code used some floating point calculations, the real life improvement is not quite as big. But even with that taken into account, my code is still considerably faster also on ARMv7 architecture.
The FM algorithm speedup was between 12 and 27 times, depending on the LFO usage. I also added a compile define that commented out all the LFO support (the no LFO column in the table) in case DotEmu wanted to get the best possible performance at the expense of some accuracy. It is not very easy to hear the difference whether the LFO is in use or not, especially when using the (usually low quality) built-in speakers of a mobile phone, so commenting out the whole LFO will allow the other more important parts of the emulation to have more CPU power.
Graphics emulation
After I had speeded up the audio emulation, I asked whether DotEmu needs my help with optimizing the graphics routines. They had already created their own heavily optimized routines in C, and after looking at them I realized that converting them to ASM would only bring very modest speedup. I decided to try optimizing them anyways, mostly just as a learning experience. In the end I was able to improve the speed of these routines only by something like 20% (so that my ASM code spent 0.8 times the CPU cycles of the C code to perform the same task), so this improvement was not terribly important. Since even a small improvement is still better than nothing, we decided to use my improved graphics routines anyways.
ARMv7 and SWPB opcode
By September my work on Raiden Legacy was pretty much done, so I began focusing on my other hobbies, while DotEmu continued with the user interface and such work on Raiden Legacy. However, then at the beginning of November DotEmu reported that they had found a problem in my core that only affected a few mobile phones, including some versions of Samsung Galaxy S2 and S3. After a short time of gameplay, the Raiden Legacy process would crash, and the crash always happened inside my 386 emulation core. This was a bit of a nasty surprise, as the release date of the project was looming near so the timing of this problem was pretty bad.
I began debugging the problem on one such affected device that DotEmu loaned to me, and indeed, for some peculiar reason my core always crashed after a short time in the game with the crash message signal 11 (SIGSEGV), code 1 (SEGV_MAPERR), fault addr 00000001. The fault address pointed to a special flag I have used in my core for the first RAM page memory access, and indeed it looked like a function pointer in the x86 code was pointing to a null address and thus the game jumped to zero address, which was obviously not correct behaviour.
I added various trace features to my core, and also ran the same game in the Windows version of MAME, comparing the register and memory values before the crash happened. This took a while, as the game executed the same routine quite a few times without any problems, before then suddenly there was an invalid value in a certain memory address. I hunted for the location where this memory address gets it's value, and found that it uses the 32-bit x86 XCHG opcode to set the memory value.
My 32-bit XCHG opcode handler looked like the following (where \reg is the ARM register emulating one of the eight x86 general purpose registers, and r2 is the actual memory address):
1:	swpb	r0, \reg, [r2]					@ r0 = first byte swapped
	add	r2, #1
	lsr	\reg, #8
	swpb	r1, \reg, [r2]					@ r1 = second byte swapped
	add	r2, #1
	lsr	\reg, #8
	swpb	r3, \reg, [r2]					@ r3 = third byte swapped
	add	r2, #1
	lsr	\reg, #8
	swpb	\reg, \reg, [r2]				@ \reg = highest byte swapped
	orr	r0, r1, lsl #8
	orr	r0, r3, lsl #16
	orr	\reg, r0, \reg, lsl #24
When looking at this implementation, I remembered that I had read in the ARM Architecture Reference Manual that the SWP and SWPB opcodes can be used for semaphores and other such hardware-specific stuff, so I thought that perhaps they have some special restrictions. I googled for "swp swpb armv7", and the first hit was about adding SWP/SWPB emulation for ARMv7 processors to the Linux ARM kernel. Now that was interesting! I had not realized that the SWP and SWPB opcodes were deprecated already on ARMv6 architecture, and they are disabled completely on ARMv7 architecture (as implemented by for example the Samsung Exynos SoC in the Samsung Galaxy S2 and S3 mobile phones)!
I decided to replace the SWPB opcodes using plain LDRB/STRB opcodes in my core, as it is not nice to use deprecated CPU features even if they seemed to work most of the time. My new XCHG implementation looks like the following:
1:	ldrb	r0, [r2]
	strb	\reg, [r2]
	lsr	\reg, #8
	ldrb	r1, [r2, #1]
	strb	\reg, [r2, #1]
	lsr	\reg, #8
	orr	r0, r1, lsl #8
	ldrb	r1, [r2, #2]
	strb	\reg, [r2, #2]
	lsr	\reg, #8
	orr	r0, r1, lsl #16
	ldrb	r1, [r2, #3]
	strb	\reg, [r2, #3]
	orr	\reg, r0, r1, lsl #24
I tested this new implementation on the problem device, and my core did not crash any more! So, it looks like the SWPB opcode was emulated on some level (either by hardware or by the Android Linux Kernel) on the Samsung Exynos processor, and there seems to be something wrong with this emulation. The lesson to be learned here is that you should not assume that CPU features and opcodes that work on earlier architecture models are available on the newer architecture. And also, if you are coding for ARMv7 acrhitecture, make sure you don't use SWP/SWPB opcodes, or you might experience weird problems on some hardware.
Summary
All in all, it has been very interesting and fun working on this project, and getting an inside glimpse at how mobile games are being made. This project suited me very well, as I was able to focus on the areas of the project that I found interesting (namely assembly optimizations), while letting DotEmu handle the (in my mind) boring stuff. :-) I hope you enjoy playing this game as much as I have enjoyed coding various bits and pieces of it!